Color Grading Software: Best Video Post-Production Tools
Ever looked at a film and been completely captivated by its atmosphere, the way the colors just seemed topopand enhance the story? That's the magic of color grading at work, and it's all thanks to some incredibly powerful software. We're diving into the world of video post-production, exploring the best color grading tools that can transform your footage from ordinary to extraordinary.
Trying to find the right tool for color grading can feel like navigating a maze. You might struggle to find software that fits your budget, skills, or the specific needs of your project. The sheer number of options, each with its own learning curve and feature set, can be overwhelming, leading to frustration and wasted time.
This article aims to illuminate the landscape of color grading software, offering a clear and concise overview of the top contenders in the video post-production world. We'll explore both professional-grade and more accessible options, highlighting their strengths, weaknesses, and ideal use cases, helping you make an informed decision that empowers your creative vision.
From industry-standard suites to user-friendly platforms, the best video post-production tools for color grading offer powerful capabilities for transforming the look and feel of your videos. Whether you're seeking precision control, creative flexibility, or seamless integration with your existing workflow, understanding the key features and benefits of each option is essential for achieving professional-quality results. We will touch on keywords like color correction, grading, video editing, post-production, software comparison, color wheels, scopes, luts, and dynamic range.
Understanding Color Correction vs. Color Grading
Color correction and color grading are often used interchangeably, but they're actually two distinct steps in the video post-production process. Color correction is about fixing technical issues in your footage – balancing exposure, removing color casts, and ensuring consistency across different shots. Color grading, on the other hand, is a more creative process, where you use color to enhance the mood, style, and overall aesthetic of your video. I remember once, working on a short film, we had shot some scenes outdoors on a cloudy day, and the footage came out looking flat and lifeless. During color correction, we balanced the exposure and contrast to make the shots look more natural. Then, during color grading, we added a slightly warmer tone to create a more inviting and cinematic feel.
Color correction, in essence, aims to achieve a neutral and accurate representation of the scene as it was captured. It involves adjustments to white balance, exposure, contrast, and saturation to correct any flaws introduced during the shooting process. These adjustments are often made using tools like curves, levels, and color wheels. The goal is to create a solid foundation for further creative manipulation. Color grading builds upon this foundation, using color to tell a story, evoke emotions, and establish a visual style. This can involve subtle tweaks to enhance the existing colors or more dramatic shifts to create a distinct look. Tools like LUTs (Lookup Tables), secondary color correction, and film emulation filters are commonly used in color grading to achieve the desired aesthetic. Color grading is not just about making the video look pretty; it's about using color to enhance the narrative and connect with the audience on an emotional level.
What Makes a Great Color Grading Software?
A great color grading software offers a blend of powerful features, intuitive workflow, and robust performance. Beyond the basic color wheels and scopes, it should provide tools for precise secondary color correction, allowing you to isolate and adjust specific colors without affecting the rest of the image. A comprehensive LUT library or the ability to create custom LUTs is also essential for achieving consistent and stylized looks. Color grading software, at its core, is a set of tools designed to manipulate the color and luminance values within a video signal. The software allows users to adjust parameters such as brightness, contrast, saturation, hue, and individual color channels (red, green, blue). These adjustments can be applied globally to the entire video or selectively to specific areas or colors. One of the key features of color grading software is the ability to perform secondary color correction. This allows users to isolate specific colors or ranges of colors and make adjustments to them without affecting other parts of the image. For example, you might want to darken the sky in a shot without affecting the skin tones of the actors. Another important feature is the use of LUTs (Lookup Tables). LUTs are pre-defined color transformations that can be applied to a video to quickly achieve a specific look or style. Software often comes with a built-in library of LUTs, and users can also create their own. The combination of these tools, along with others such as curves, levels, and scopes, allows colorists to sculpt the color of a video to achieve the desired artistic effect.
A Brief History of Color Grading
The history of color grading is intertwined with the evolution of filmmaking itself. In the early days of cinema, color was a luxury, often added manually through hand-tinting or stencil processes. As color film technology advanced, so did the need for more sophisticated color control. Initially, this was achieved through photochemical processes in the film lab. Color timers would adjust the exposure and filtration during printing to correct for inconsistencies and create a desired look. The transition to digital color grading marked a significant turning point. Non-linear editing systems (NLEs) like Avid and Final Cut Pro began incorporating basic color correction tools, but it was dedicated color grading software like Da Vinci Resolve that truly revolutionized the field. Da Vinci Resolve, originally a hardware-based system, offered unprecedented control and precision, becoming the industry standard for high-end color grading. The history and mythology of color grading is rich with stories of artists pushing the boundaries of what's possible with color. From the subtle enhancements that create a sense of realism to the bold and stylized looks that define a genre, color grading has played a vital role in shaping the cinematic landscape. Color grading has gone from being a technical process done in labs to a creative one that is done by artists on computers. This shift has allowed for new and exciting ways to tell stories with color.
Unveiling the Hidden Secrets of Color Grading
One of the best-kept secrets of professional color grading is the power of using reference images. Before embarking on a color grading project, gather stills from films, photographs, or even paintings that capture the desired mood and aesthetic. These references serve as a visual guide, helping you stay consistent and achieve a cohesive look. Furthermore, understanding the psychology of color can significantly enhance your color grading skills. Colors evoke different emotions and associations, and strategically using them can strengthen the narrative impact of your video. For example, warm colors like red and orange can create a sense of energy and passion, while cool colors like blue and green can evoke feelings of calmness and serenity. Hidden in plain sight is the power of collaboration between the colorist and the director of photography. When both share a clear vision, they can work together to enhance the story and bring the director's ideas to life. Also, the art of creating skin tones is a skill that few colorists can truly master. Achieving natural and healthy-looking skin tones is crucial for creating believable and engaging characters. These are secrets that are often not talked about. But, they play a very important part in the art of color grading.
Top Color Grading Software Recommendations
When it comes to choosing the best color grading software, there's no one-size-fits-all answer. The ideal choice depends on your budget, skill level, and the specific requirements of your projects. However, some standout options consistently rank among the top contenders. Da Vinci Resolve is widely regarded as the industry standard, offering a comprehensive suite of tools for color correction, color grading, editing, and visual effects. It's a powerhouse for professional filmmakers and colorists, but its free version also makes it accessible to beginners. Adobe Premiere Pro, with its integrated Lumetri Color panel, provides a robust color grading workflow within a familiar editing environment. It's a great option for editors who want to handle both editing and color grading in a single application. For those seeking a more streamlined and user-friendly experience, Filmora offers a simplified color grading interface with a range of presets and filters. This software is ideal for hobbyists and content creators who want to quickly enhance the look of their videos. Ultimately, the best color grading software is the one that empowers you to realize your creative vision and achieve the desired aesthetic for your projects. It is recommended to try the free version and then choose the best color grading software for your purposes.
Understanding Scopes and Waveforms
Scopes and waveforms are essential tools for any colorist, providing a visual representation of the luminance and color information in your video. Understanding how to read and interpret these tools is crucial for making accurate and informed color grading decisions. The waveform monitor displays the luminance levels in your video, showing the brightness of each pixel from black to white. It's particularly useful for identifying overexposed or underexposed areas, ensuring that your video has a balanced dynamic range. The vectorscope displays the color information in your video, showing the hue and saturation of each pixel. It's useful for identifying color casts, balancing colors, and ensuring that your video has a consistent color palette. The histogram displays the distribution of luminance values in your video, showing how many pixels are at each brightness level. It's useful for assessing the overall exposure of your video and identifying any areas that may be clipping (losing detail). By learning to use scopes and waveforms effectively, you can gain a deeper understanding of your video's technical characteristics and make more precise and informed color grading decisions. These tools are invaluable for achieving consistent and professional-looking results. Scopes and waveforms remove any subjectivity of the color grading process. Without these tools, you would be using your eyes only to grade which could lead to error since monitors are not accurate.
Essential Color Grading Tips for Beginners
Embarking on the journey of color grading can be daunting, but with a few essential tips, you can quickly improve your skills and achieve impressive results. Start with the basics: focus on color correction first, balancing exposure, and removing color casts before moving on to the creative aspects of color grading. Use references: gather stills from films, photographs, or paintings that inspire you and use them as a visual guide. Don't overdo it: subtle adjustments often have the most significant impact. Avoid pushing the colors too far, as this can lead to an unnatural and unrealistic look. Learn to read scopes: understand how to use waveforms, vectorscopes, and histograms to accurately assess the luminance and color information in your video. Practice regularly: the more you practice, the better you'll become at seeing color and making informed color grading decisions. Experiment with different techniques: explore different color grading styles, LUTs, and effects to find what works best for your projects. Seek feedback: share your work with others and ask for constructive criticism. Fresh eyes can often spot things that you may have missed. By following these tips, you can lay a solid foundation for your color grading journey and start creating stunning visuals. Remember that it takes time and patience to master color grading. So, don't get discouraged if you don't see results right away.
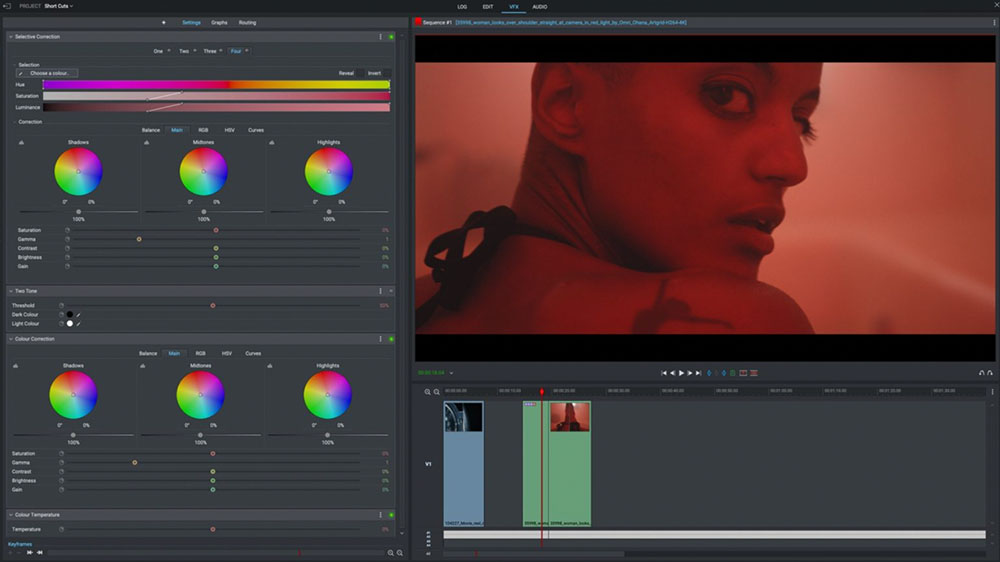
Mastering Secondary Color Correction
Secondary color correction is a powerful technique that allows you to isolate and adjust specific colors or ranges of colors in your video without affecting the rest of the image. This is particularly useful for fixing problems like skin tones that are too red or skies that are too dull. To perform secondary color correction, you first need to select the color range you want to adjust. This can be done using a variety of tools, such as HSL (Hue, Saturation, Luminance) qualifiers, color pickers, or even drawing shapes on the image. Once you've selected the color range, you can then adjust its hue, saturation, luminance, contrast, and other parameters. This allows you to fine-tune the color and create the desired look. One of the most common uses of secondary color correction is to adjust skin tones. If the skin tones in your video are too red, you can use a secondary color correction tool to select the red range and reduce its saturation. You can also use secondary color correction to enhance the colors of specific objects in your video. For example, if you have a shot of a flower, you can use secondary color correction to select the flower's color range and increase its saturation and luminance. This will make the flower stand out more and create a more visually appealing image. It's important to use secondary color correction sparingly, as overdoing it can lead to an unnatural and artificial look. The key is to make subtle adjustments that enhance the colors without making them look fake.
Fun Facts About Color Grading
Did you know that the term "color grading" originally referred to the process of selecting the best prints from a batch of film prints in a lab? The color timer would "grade" the prints based on their color balance and density, choosing the ones that best matched the director's vision. Another fun fact is that some filmmakers intentionally use color grading to create a specific visual style that becomes their signature. For example, director Wes Anderson is known for his use of pastel colors and symmetrical compositions. The movie, O Brother, Where Art Thou?, was the first film that was fully color graded in a digital way. The makers changed the color of the grass in the film from green to brown. They wanted to give the movie a look like the 1930s during the time of the Great Depression. Even the shape of the film can be changed with color grading. Cinematographers use different aspect ratios to change how the viewer sees the movie, how they are emotionally affected, and how much information they get from the scene. These examples are just a few of the many fun facts that highlight the fascinating history and evolution of color grading.
How to Create a Cinematic Look with Color Grading
Achieving a cinematic look with color grading is a skill that requires practice and attention to detail. However, by following a few key techniques, you can significantly enhance the visual appeal of your videos and create a more professional and polished result. Start by establishing a clear vision for the overall look and feel of your video. What mood do you want to create? What colors will best convey that mood? Gather reference images from films, photographs, or paintings that inspire you and use them as a visual guide. Once you have a clear vision, begin by balancing the exposure and removing any color casts. This is essential for creating a solid foundation for your color grading. Next, focus on creating a consistent color palette. Choose a few key colors that will dominate your video and use them strategically throughout. This will help to create a cohesive and visually appealing look. Pay attention to skin tones. Achieving natural and healthy-looking skin tones is crucial for creating believable and engaging characters. Use secondary color correction to fine-tune skin tones and ensure that they look their best. Finally, experiment with different color grading styles, LUTs, and effects to find what works best for your projects. Don't be afraid to push the boundaries and try new things. The key is to have fun and let your creativity shine through.
What If Color Grading Didn't Exist?
Imagine a world without color grading. Films would lack the emotional depth and visual impact that we've come to expect. Scenes would feel flat and lifeless, unable to transport us to other worlds or evoke the desired emotions. Color grading is not just about making videos look pretty; it's about using color to tell a story, enhance the narrative, and connect with the audience on an emotional level. The whole viewing experience will not be the same. Every movie would be very similar to each other. Color grading is a tool that brings a lot of diversity to the film industry. Without it, it would be hard to differentiate the different movie genres. Without color grading, cinematographers wouldn't be able to put their unique touch on movies. People can see a difference between a movie made by a professional, and one that is amateur. Color grading is one of the main contributing factors for this. A world without color grading is a world with less art and storytelling, where the power of color to evoke emotion and enhance the narrative is lost.
Top 5 Color Grading Techniques Every Editor Should Know
Here's a listicle of five essential color grading techniques that every video editor should master: 1. Balancing Exposure: Correcting overexposed or underexposed footage to achieve a balanced and natural-looking image.
2. Removing Color Casts: Eliminating unwanted color tints from your footage to create a neutral and accurate color balance.
3. Creating a Color Palette: Selecting a few key colors that will dominate your video and using them strategically throughout to create a cohesive and visually appealing look.
4. Mastering Skin Tones: Achieving natural and healthy-looking skin tones by using secondary color correction to fine-tune the hue, saturation, and luminance of skin tones.
5. Using LUTs: Applying pre-designed color transformations (LUTs) to quickly achieve a specific look or style. These five techniques provide a solid foundation for your color grading journey, empowering you to transform your videos from ordinary to extraordinary. These methods are simple, but very effective.
Question and Answer
Here are some frequently asked questions about color grading:
Q: What's the difference between color correction and color grading?
A: Color correction is about fixing technical issues like exposure and color casts, while color grading is about creating a specific mood and style.
Q: Do I need expensive software to do color grading?
A: No, there are free options like Da Vinci Resolve that offer powerful color grading tools.
Q: How long does it take to learn color grading?
A: It depends on your dedication and learning style, but with consistent practice, you can start seeing results in a few weeks.
Q: Can color grading fix bad footage?
A: While color grading can improve footage, it can't fix fundamental problems like severe overexposure or blurriness. It's always best to start with well-shot footage.
Conclusion of Color Grading Software: Best Video Post-Production Tools
Color grading is an indispensable tool in modern video post-production, enabling filmmakers and content creators to elevate their visuals and tell compelling stories through the power of color. By understanding the principles of color correction and grading, exploring the various software options available, and mastering essential techniques, you can unlock your creative potential and transform your videos into captivating works of art. Remember to always balance technical precision with artistic vision, and to experiment and refine your skills to develop your own unique color grading style. From understanding the nuances between color correction and grading, to choosing the right software and mastering essential techniques, the information shared here should empower you to take your video projects to the next level.
Post a Comment